Spark-Core 相关的模块
- 执行环境,Env和SparkContext
- RPC 相关
- 存储体系
- 计算
- scheduler
- deploy
- API 相关
存储体系
整体架构
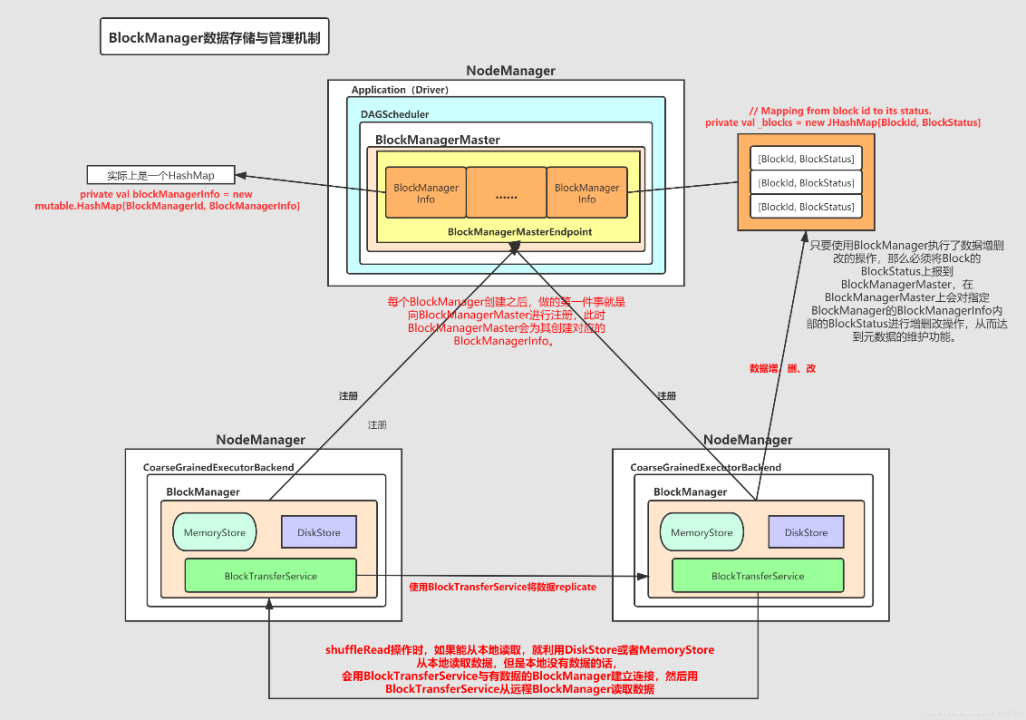
BlockManager 相关的架构图
BlockId 相关
| BlockId Implementation |
Purpose |
| RDDBlockId |
Identifies a partition of an RDD. |
| ShuffleBlockId |
Identifies shuffle data output by a shuffle stage. |
| BroadcastBlockId |
Identifies broadcast variables for tasks. |
| TaskResultBlockId |
Identifies task result blocks stored temporarily. |
一些核心组件
- BlockManager
- BlockInfoManager
- BlockManagerMaster
- MemoryManager
- MemoryStore
- DiskBlockManager
- DiskStore
- BlockManagerMasterEndpoint
- BlockManagerSlaveEndpoint
- BlockTransferService
内存相关类
| Component |
Layer |
Scope |
Responsibilities |
| MemoryManager |
Low-Level |
Executor-specific |
Manages memory allocation between execution and storage pools. |
| MemoryStore |
High-Level |
Executor-specific |
Manages in-memory storage of blocks, relies on MemoryManager for memory allocation. |
MemoryManager 将内存分为
- execution memory
- storage memory
而 MemoryStore 则作为一个更高层的组件,负责 block 的管理
磁盘存储相关
| Component |
Layer |
Scope |
Responsibilities |
| DiskBlockManager |
Low-Level |
Executor-specific |
Handles physical file operations for block storage on disk. |
| DiskStore |
High-Level |
Executor-specific |
Provides a block-level interface for disk storage, relies on DiskBlockManager. |
DiskStore 和 DiskBlockManager 的关系,跟 内存的类似,只是读写的是磁盘
主从节点 相关的几个类
- BlockManagerMaster,这个是中央类,包含了:block_id –> 具体 block 所在的节点
- BlockManager,每个executor 上都有一个,负责跨集群的块管理,block 的生命周期管理等
- BlockInfoManager,每个executor 一个,存储:block id -> 大小,存储级别等元信息
RPC 相关的
- BlockTransferService,当本地内存、磁盘都没有,则向远端 其他节点的 block-manager获取数据
- BlockManagerMasterEndpoint,主节点 RPC,负责接受 block-manager的一些查询,以及元数据更新请求
- BlockManagerSlaveEndpoint,从节点 RPC,向 master 发送元数据更新等信息
执行流程
另一个视角
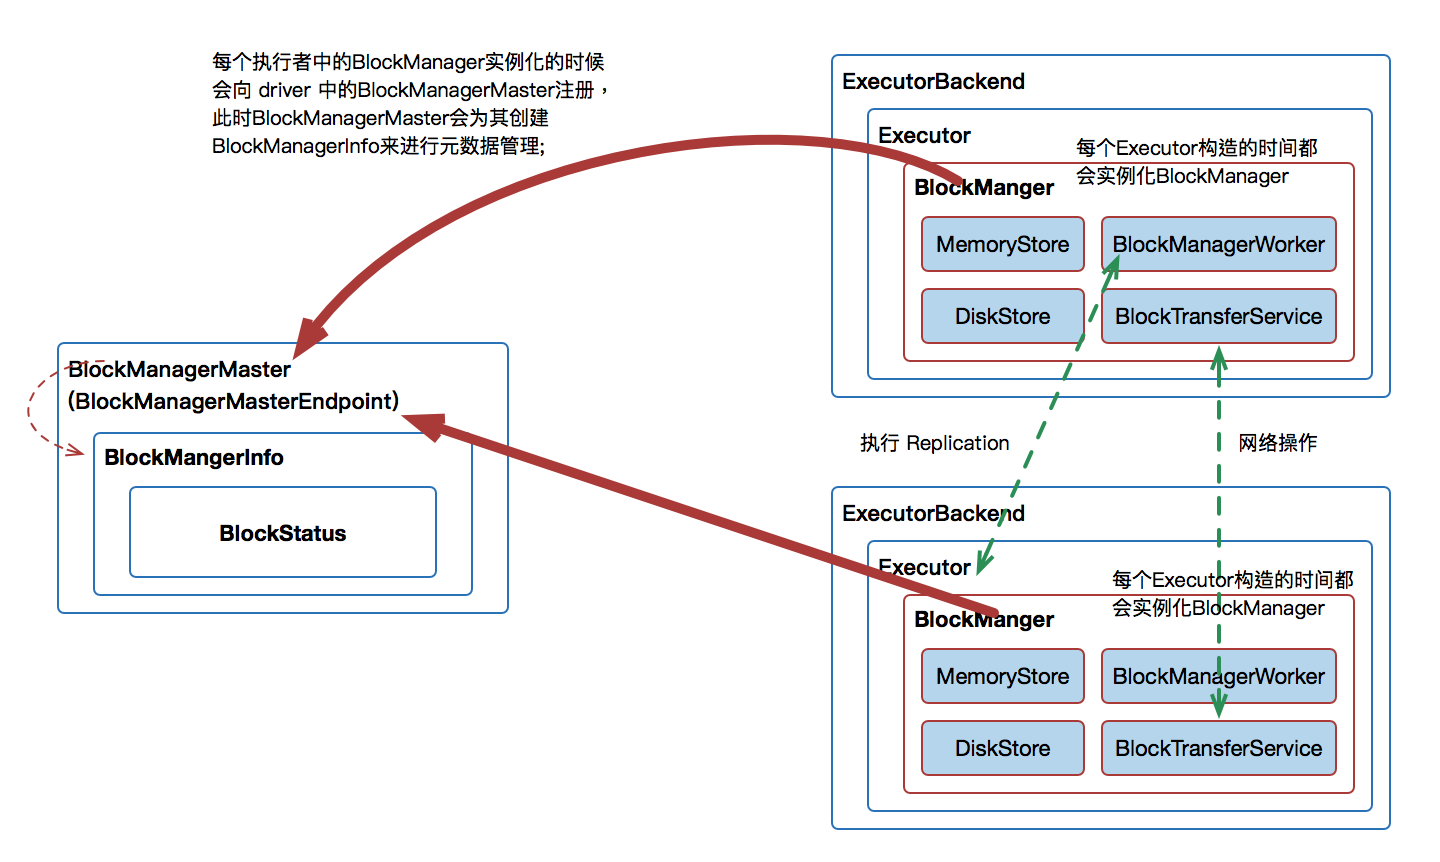
一个完整的流程
存储一个block
- executor 创建一个 分区
- 存储这些block,发送给 BlockManager
- 存储的 block 放在 RDD_0_0,如果内存不足就放磁盘
- BlockInfoManager,记录元信息
- 全局注册,发送给 BlockManagerMaster 记录 block_id -> 块的具体位置信息
检索块信息
- executor 上的 task,检索:RDD_0_0
- 调用:BlockManager.getBlockData(BlockId) 获取块信息
- 这里会使用 BlockInfoManager 做一些读、写加锁操作,防止并发问题
- 调用 MemoryStore 、DiskStore 从内存或者磁盘读取
- 如果本地没有,则向 BlockManagerMaster 通讯,查询 RDD_0_0 的具体位置
- 通过 BlockTransferService 向远端机器真正的获取数据
- 之后将这个 block 存储在本地内存/磁盘
shuffle 操作
- map task 写中间结果到磁盘,这里会委托 BlockManager 完成 block 的写磁盘操作
- BlockManager 将 block 的信息发送给BlockManagerMaster,记录block 的元信息
- reduce task 请求这些 shuffle 数据
- executor 上的 BlockManager 从 BlockManagerMaster 上获取 shuffle 的 block 具体位置
- 通过 BlockTransferService 从远程节点上获取数据
block 存储的内容一般为:
- RDD partitions: Each RDD partition is stored as a block.
- Shuffle data: Intermediate data generated during shuffle operations.
- Broadcast variables: Data shared across tasks.
- Task results: Intermediate task results temporarily stored for fault tolerance.
block 大小和内容
- 一般跟分区是 1 对 1 映射的,多少分区,多少 block
- 可以配置 shuffle 的文件大小,也就是 shuffle block 的大小
- 内存中一般是 raw 的java对象,磁盘中是序列化后的内容
- 广播变量等也会存储为 block,但是大小不固定
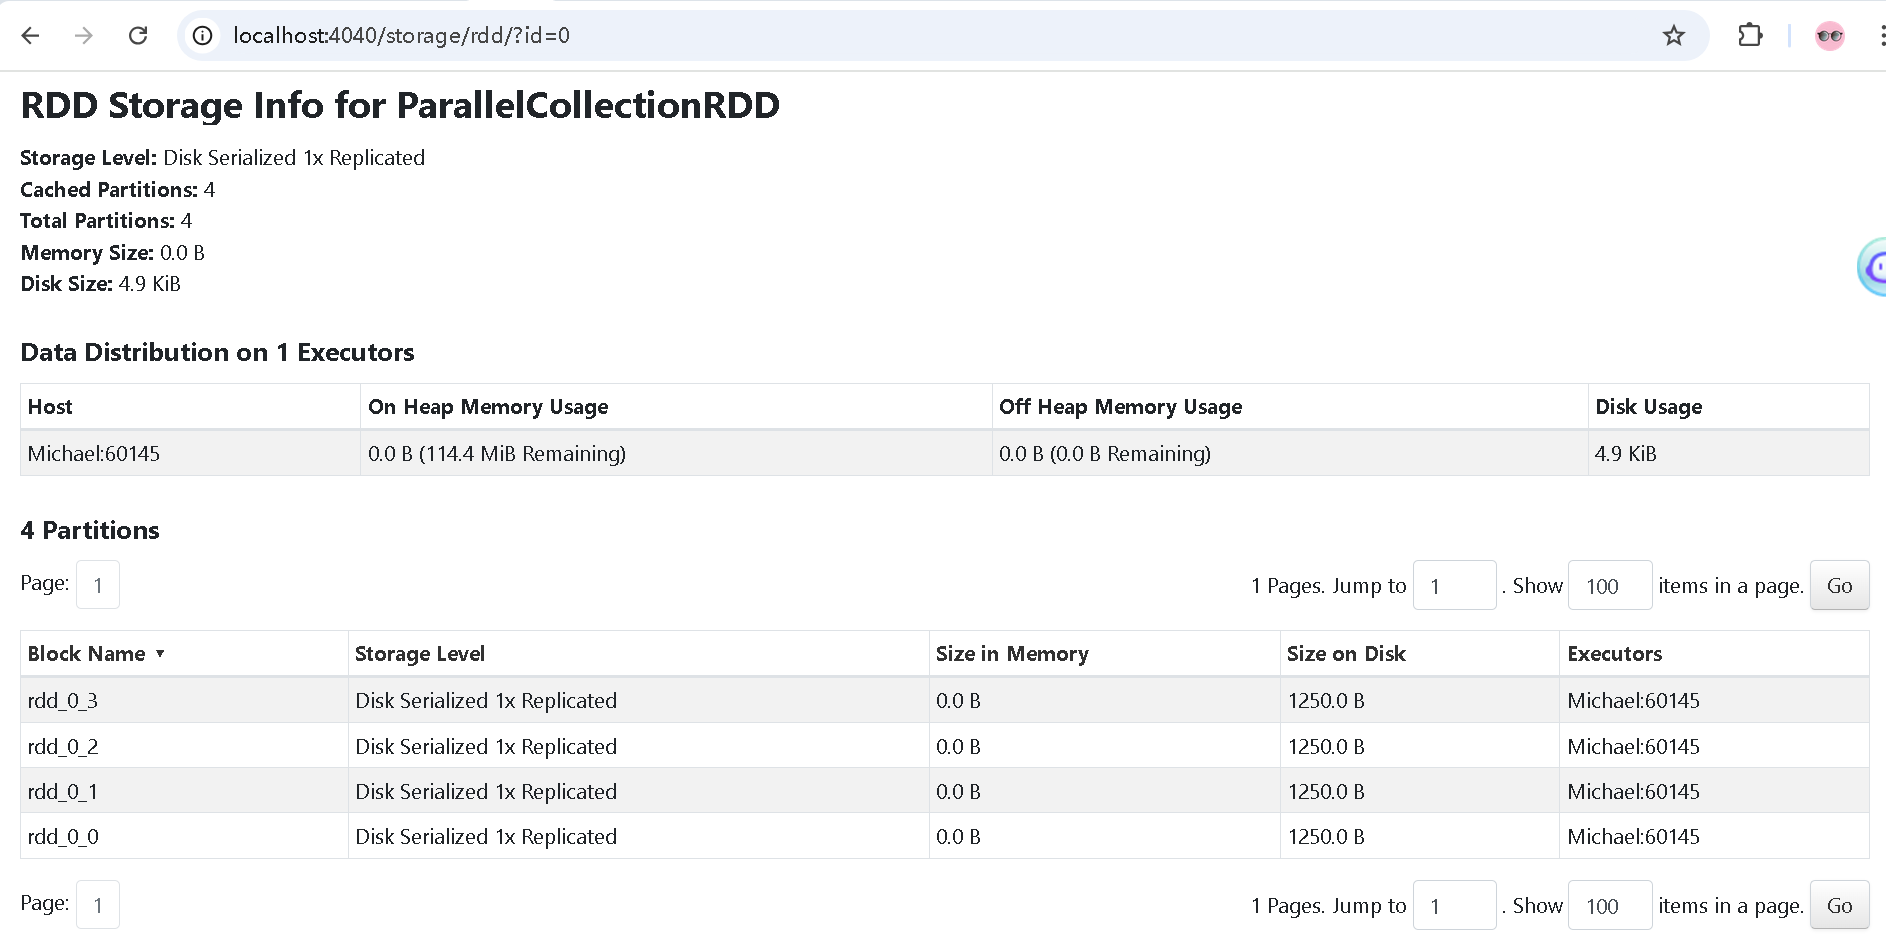
测试代码,观察本地 block 的情况
 1
 2
 3
 4
 5
 6
 7
 8
 9
10
11
12
13
14
15
16
17
18
19
20
21
22
23
24
25
26
27
28
29
30
31
32
33
34
|
import org.apache.spark.storage.StorageLevel
import org.apache.spark.sql.SparkSession

object BlockStorageTest {
  def main(args: Array[String]): Unit = {
    // Step 1: Create Spark Session
    val spark = SparkSession.builder()
      .appName("Block Storage Test")
      .master("local[*]")
      .config("spark.local.dir", "D:\\tmp\\spark_data")
      .getOrCreate()

    val sc = spark.sparkContext

    // Step 2: Create an RDD
    val data = 1 to 1000 // Sample data
    val rdd = sc.parallelize(data, numSlices = 4)

    // Step 3: Persist the RDD to memory and disk
    rdd.persist(StorageLevel.DISK_ONLY)

    // Step 4: Trigger an action to store the blocks
    rdd.count() // Action to compute and store the blocks

    // Step 5: Log the disk storage location
    println("Disk storage location: " + sc.getConf.get("spark.local.dir"))

    // Keep the application alive to inspect the disk manually
    Thread.sleep(60000)

    // Stop SparkSession
    spark.stop()
  }
}
|
在 spark.local.dir 目录下,生成了
- blockmgr-f733139a-820e-4ef9-9b1d-cae27c6debfa
这里目录又包含了
- 0e
- 11
- 14,里面有 rdd_0_0 文件
- 15,里面有 rdd_0_1 文件
- 16,有 rdd_0_2
- 17,有 rdd_0_3
本地可以观察 spark-ui
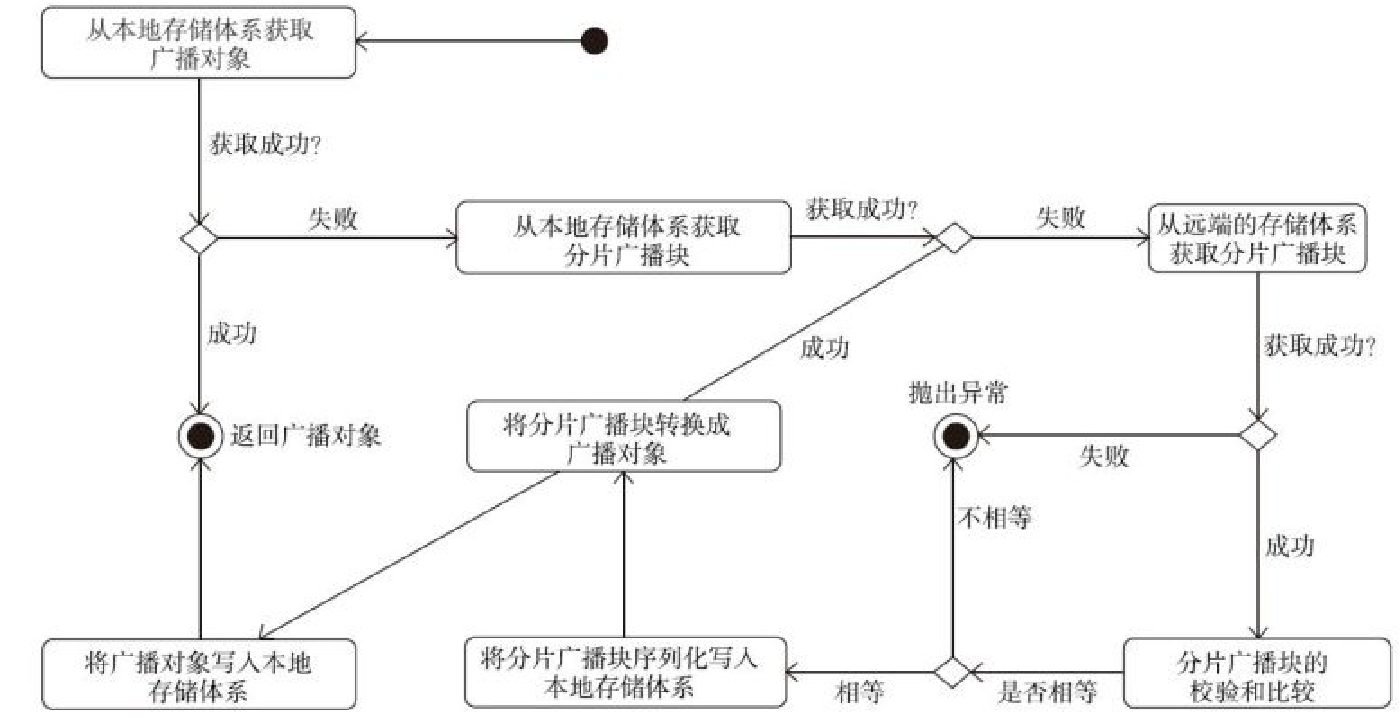
BoradcastManager 执行流程
Map 监控体系
Tracker 的几个类
- MapOutputTracker,父类
- MapOutputTrackerMaster
- MapOutputTrackerWorker
这些类还引用了:ShuffleStatus
相关的类
1
|
private[spark] sealed trait MapOutputTrackerMessage
|
MapOutputTrackerMessage 的实现类
 1
 2
 3
 4
 5
 6
 7
 8
 9
10
11
12
13
14
15
16
17
|
private[spark] case class GetMapOutputStatuses(shuffleId: Int)
  extends MapOutputTrackerMessage
private[spark] case class GetMapAndMergeResultStatuses(shuffleId: Int)
  extends MapOutputTrackerMessage
private[spark] case class GetShufflePushMergerLocations(shuffleId: Int)
  extends MapOutputTrackerMessage
private[spark] case object StopMapOutputTracker extends MapOutputTrackerMessage

private[spark] sealed trait MapOutputTrackerMasterMessage
private[spark] case class GetMapOutputMessage(shuffleId: Int,
  context: RpcCallContext) extends MapOutputTrackerMasterMessage
private[spark] case class GetMapAndMergeOutputMessage(shuffleId: Int,
  context: RpcCallContext) extends MapOutputTrackerMasterMessage
private[spark] case class GetShufflePushMergersMessage(shuffleId: Int,
  context: RpcCallContext) extends MapOutputTrackerMasterMessage
private[spark] case class MapSizesByExecutorId(
  iter: Iterator[(BlockManagerId,
|
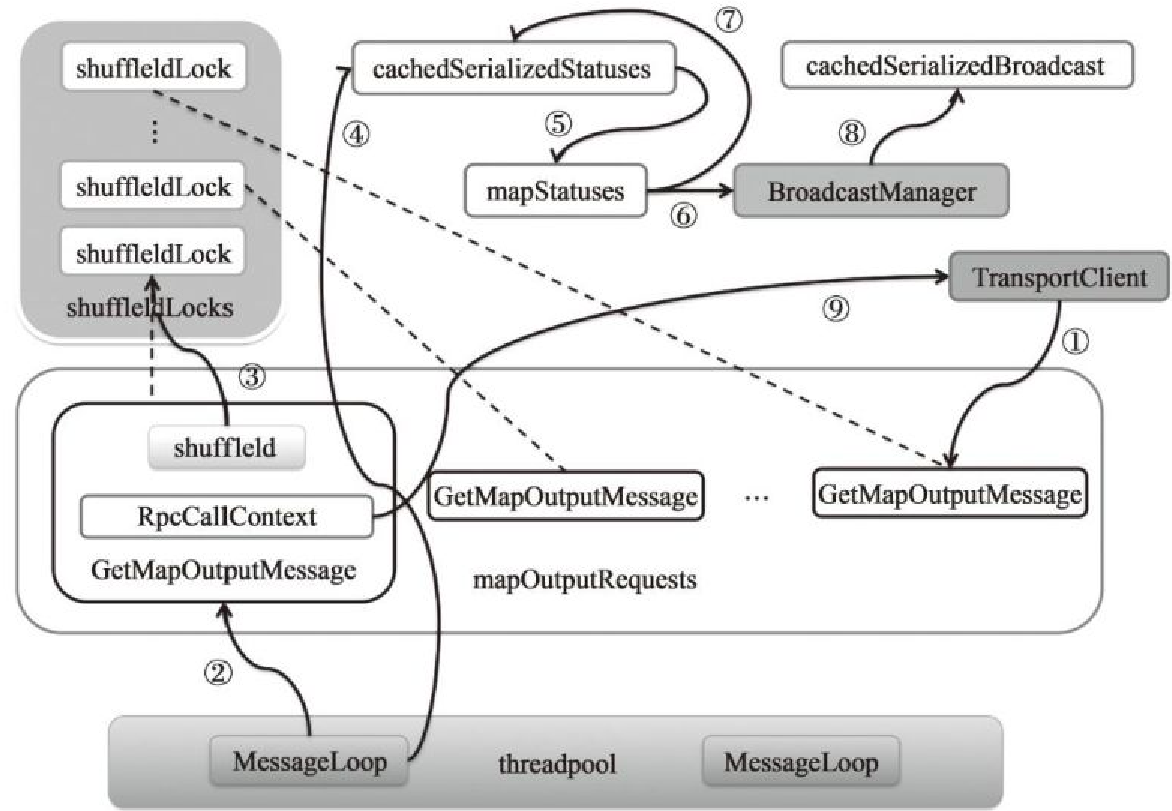
调用解释
- (1)表示某个Executor调用MapOutputTrackerWorker的getStatuses方法获取某个shuffle的map任务状态信息
- (2)MessageLoop线程从mapOutputRequests队头取出GetMapOutputMessage
- (3)从shuffleIdLocks数组中取出与当前GetMapOutputMessage携带的shuffleId相对应的锁
- (4)首先从cachedSerializedStatuses缓存中获取shuffleId对应的序列化任务状态信息
- (5)第四步没找到,从 mapStatuses中缓存的shuffleId对应的任务状态数组
- (6)序列化后广播
- (7)将序列化的任务状态放入cachedSerializedStatuses缓存中
- (8)将广播对象放入cachedSerializedBroadcast缓存中
- (9)将获得的序列化任务状态信息,通过回调GetMapOutputMessage消息携带的RpcCallContext的reply方法回复客户端
WEB-UI
整体结构
入口类: org.apache.spark.ui.SparkUI
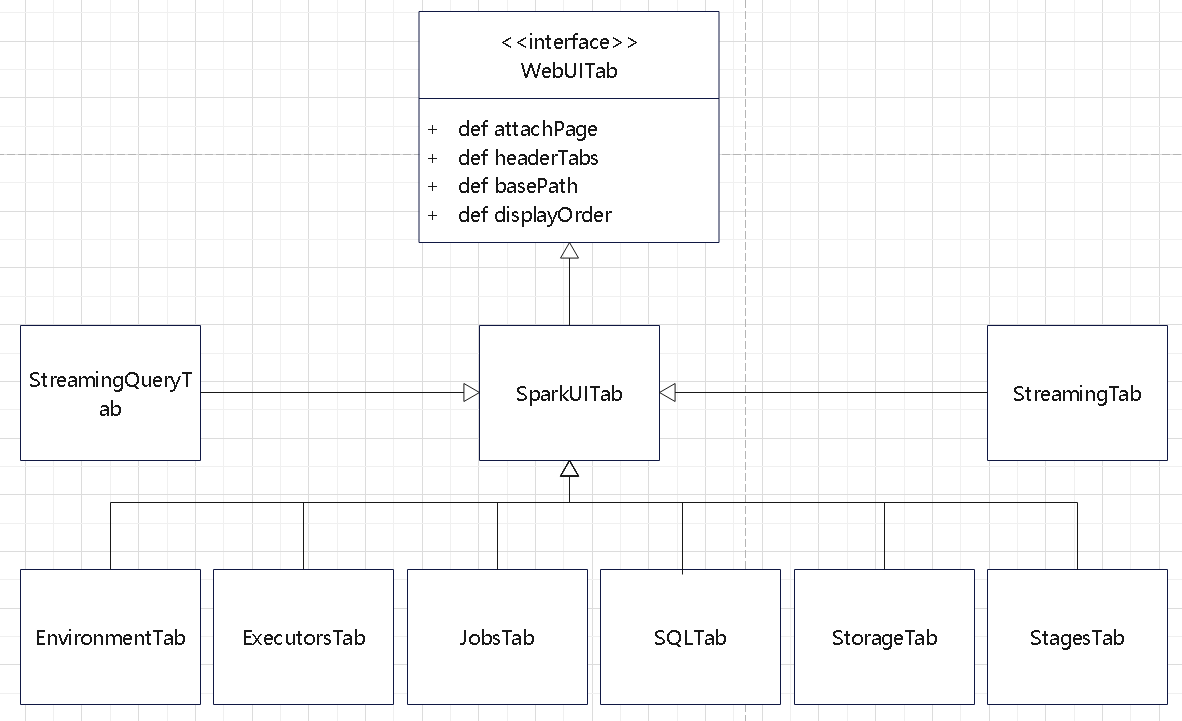
层次体系
- SparkUI,该类继承子WebUI,中枢类,负责启动jetty,保存页面和URL Path之间的关系等
- SparkUITab(继承自WebUITab) ,就是首页的标签栏
- WebUIPage,这个是具体的页面。
- SparkUI 负责整个Spark UI构建是,同时它是一切页面的根对象。
- 对应的层级结构为: SparkUI -> WebUITab -> WebUIPage
初始化类
 1
 2
 3
 4
 5
 6
 7
 8
 9
10
11
12
13
14
15
16
17
18
19
20
21
22
|
  def initialize(): Unit = {
    val jobsTab = new JobsTab(this, store)
    attachTab(jobsTab)
    val stagesTab = new StagesTab(this, store)
    attachTab(stagesTab)
    attachTab(new StorageTab(this, store))
    attachTab(new EnvironmentTab(this, store))
    attachTab(new ExecutorsTab(this))
    addStaticHandler(SparkUI.STATIC_RESOURCE_DIR)
    attachHandler(createRedirectHandler("/", "/jobs/", basePath = basePath))
    attachHandler(ApiRootResource.getServletHandler(this))
    if (sc.map(_.conf.get(UI_PROMETHEUS_ENABLED)).getOrElse(false)) {
      attachHandler(PrometheusResource.getServletHandler(this))
    }

    // These should be POST only, but, the YARN AM proxy won't proxy POSTs
    attachHandler(createRedirectHandler(
      "/jobs/job/kill", "/jobs/", jobsTab.handleKillRequest, httpMethods = Set("GET", "POST")))
    attachHandler(createRedirectHandler(
      "/stages/stage/kill", "/stages/", stagesTab.handleKillRequest,
      httpMethods = Set("GET", "POST")))
  }
|
attachPage 的核心逻辑:
 1
 2
 3
 4
 5
 6
 7
 8
 9
10
11
12
|
  def attachPage(page: WebUIPage): Unit = {
    val pagePath = "/" + page.prefix
    val renderHandler = createServletHandler(pagePath,
      (request: HttpServletRequest) => page.render(request), conf, basePath)
    val renderJsonHandler = createServletHandler(pagePath.stripSuffix("/") + "/json",
      (request: HttpServletRequest) => page.renderJson(request), conf, basePath)
    attachHandler(renderHandler)
    attachHandler(renderJsonHandler)
    val handlers = pageToHandlers.getOrElseUpdate(page, ArrayBuffer[ServletContextHandler]())
    handlers += renderHandler
    handlers += renderJsonHandler
  }
|
创建 createServletHandler 的逻辑
就是 创建一个 HttpServlet,然后加入到 jetty 的体系中
 1
 2
 3
 4
 5
 6
 7
 8
 9
10
11
12
13
14
15
|
  def createServletHandler(
      path: String,
      servlet: HttpServlet,
      basePath: String): ServletContextHandler = {
    val prefixedPath = if (basePath == "" && path == "/") {
      path
    } else {
      (basePath + path).stripSuffix("/")
    }
    val contextHandler = new ServletContextHandler
    val holder = new ServletHolder(servlet)
    contextHandler.setContextPath(prefixedPath)
    contextHandler.addServlet(holder, "/")
    contextHandler
  }
|
Web table 继承关系
WEB-ui page 继承关系
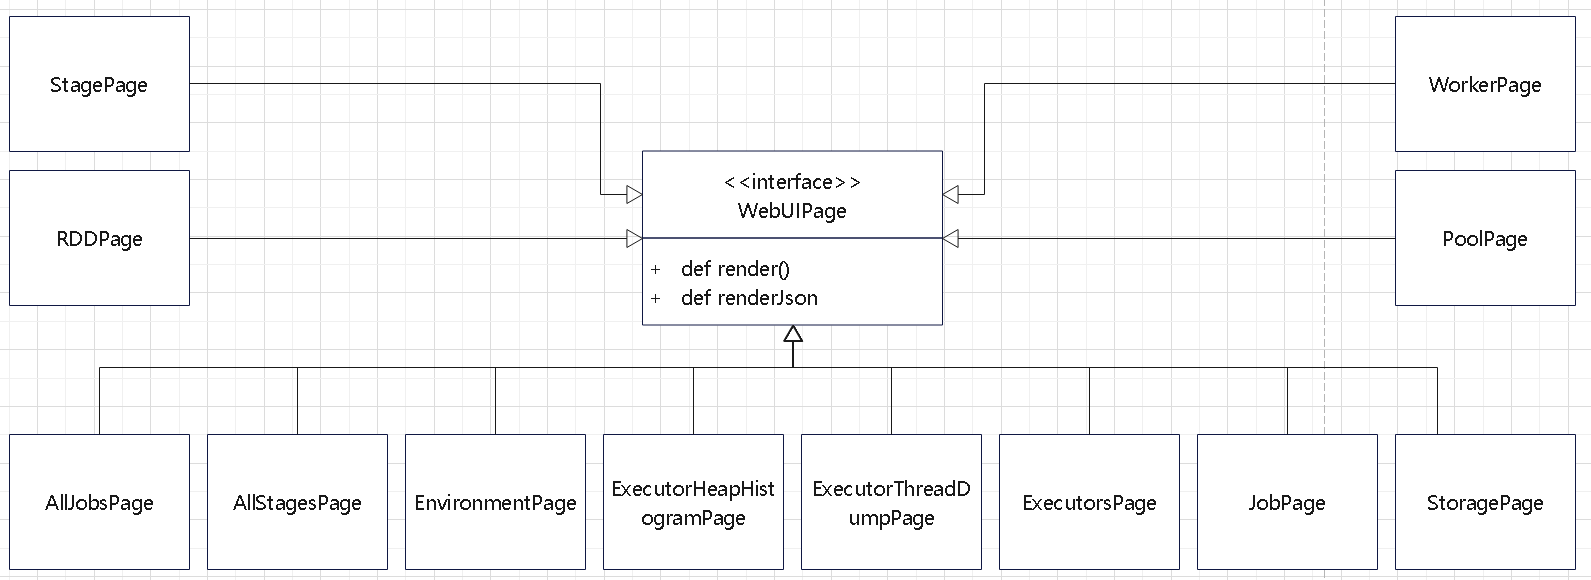
而 WebUI 会创建 HttpServlet,并加入到 Jetty 的 Hanlder 体系中
自定义 UI
增加一个自定义的 页面
1
2
3
4
5
6
|
class MyTab(parent: SparkUI, store: AppStatusStore)
  extends SparkUITab(parent, "my_tab") {

  attachPage(new MyStoragePage(this, store))

}
|
MyStoragePage 内容内容拷贝自 StoragePage
注意要将这个类中的 [storage] 删除,不然编译会出错
启动类
 1
 2
 3
 4
 5
 6
 7
 8
 9
10
11
12
|
  def go(): Unit = {
    val spark = SparkSession.builder()
      .appName("Block Storage Test")
      .master("local[*]")
      .getOrCreate()

    val sc = spark.sparkContext
    val ui: SparkUI = sc.ui.getOrElse(throw new RuntimeException("Not support web ui."))
    val store = ui.store
    ui.attachTab(new MyTab(ui, store))
    Thread.sleep(Long.MaxValue)
  }
|
启动后,spark-ui 中就多了一个 page

也可以增加其他类型
1
2
3
|
    ui.attachHandler()
    ui.addStaticHandler()
    ui.attachPage()
|
执行环境
env
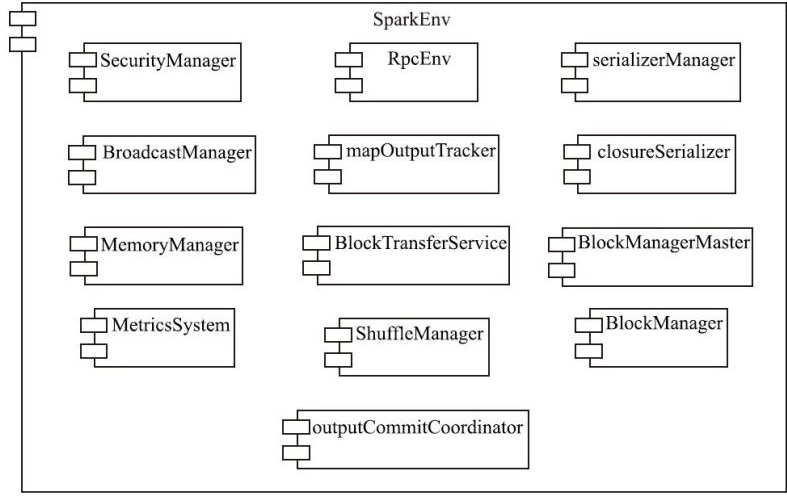
安全体系
- SecurityManager
- 用于设置 yarn,hadoop 的 secret key
SparkContext 会附带初始化
- Metrics 体系
- Listener
- SparkUI
- RPC 整套体系
- BlockManager,storage 体系
- Executor 体系
- Heartbeater
- KVStore
- SerializerManager
度量类
- MetricsSystem
- 提供了 source、sink
日志体系
- org.apache.spark.internal.Logging
- 整合了 org.slf4j
- 提供了 info,warn 等函数
PRC 体系
客户端服务端例子
一个服务端的类
 1
 2
 3
 4
 5
 6
 7
 8
 9
10
11
12
13
14
15
16
17
18
19
20
21
22
23
24
25
26
27
28
29
30
31
32
33
34
35
36
37
|
import org.apache.spark.{SparkConf, SparkContext}

object RpcServer {

  class HelloWorldEndpoint(val rpcEnv: RpcEnv) extends RpcEndpoint {
    override def receiveAndReply(context: RpcCallContext): PartialFunction[Any, Unit] = {
      case "Hello" =>
        println("Received 'Hello' message")
        context.reply("Hello from the server!")
      case _ =>
        context.reply("Unknown message")
    }

    override def receive: PartialFunction[Any, Unit] = {
      case msg => println(s"Received: $msg")
    }

    override def onStop(): Unit = {
      println("Stopping the server endpoint")
    }
  }

  def main(args: Array[String]): Unit = {
    val conf = new SparkConf().setAppName("Spark RPC Hello World").setMaster("local[2]")
    val sc = new SparkContext(conf)
    val rpcEnv: RpcEnv = RpcEnv.create("HelloWorldServer", "localhost",
      9999, conf, sc.env.securityManager)

    // Register the HelloWorld endpoint
    val helloEndpoint = rpcEnv.setupEndpoint("helloEndpoint", new HelloWorldEndpoint(rpcEnv))

    println("Server is running and waiting for messages...")
    Thread.sleep(Long.MaxValue)  // Keep the server running
    rpcEnv.stop(helloEndpoint)  // Shutdown the server
    sc.stop()  // Stop SparkContext
  }
}
|
客户端类
 1
 2
 3
 4
 5
 6
 7
 8
 9
10
11
12
13
14
15
16
17
18
19
20
21
22
23
24
25
26
27
28
29
30
|
import org.apache.spark.{SparkConf, SparkContext}
import scala.concurrent.ExecutionContext.Implicits.global
import scala.util.{Failure, Success}

object RpcClient {

  def main(args: Array[String]): Unit = {
    val conf = new SparkConf().setAppName("Spark RPC Hello World Client").setMaster("local[2]")
    val sc = new SparkContext(conf)
    val rpcEnv: RpcEnv = RpcEnv.create("HelloWorldClient", "localhost",
      9999, conf, sc.env.securityManager)

    // Connect to the server endpoint
    val address = new RpcAddress("localhost", 9999)
    val helloEndpoint = rpcEnv.setupEndpointRef(address, "helloEndpoint")

    // Send a message to the server
    helloEndpoint.ask[String]("Hello").onComplete {
      case Success(response) =>
        println(s"Received from server: $response")
      case Failure(e) =>
        println(s"Failed to receive response from server: ${e.getMessage}")
    }

    // Let the client wait for the response
    Thread.sleep(2000)

    sc.stop()
  }
}
|
network 包
org.apache.spark.network 包的结构
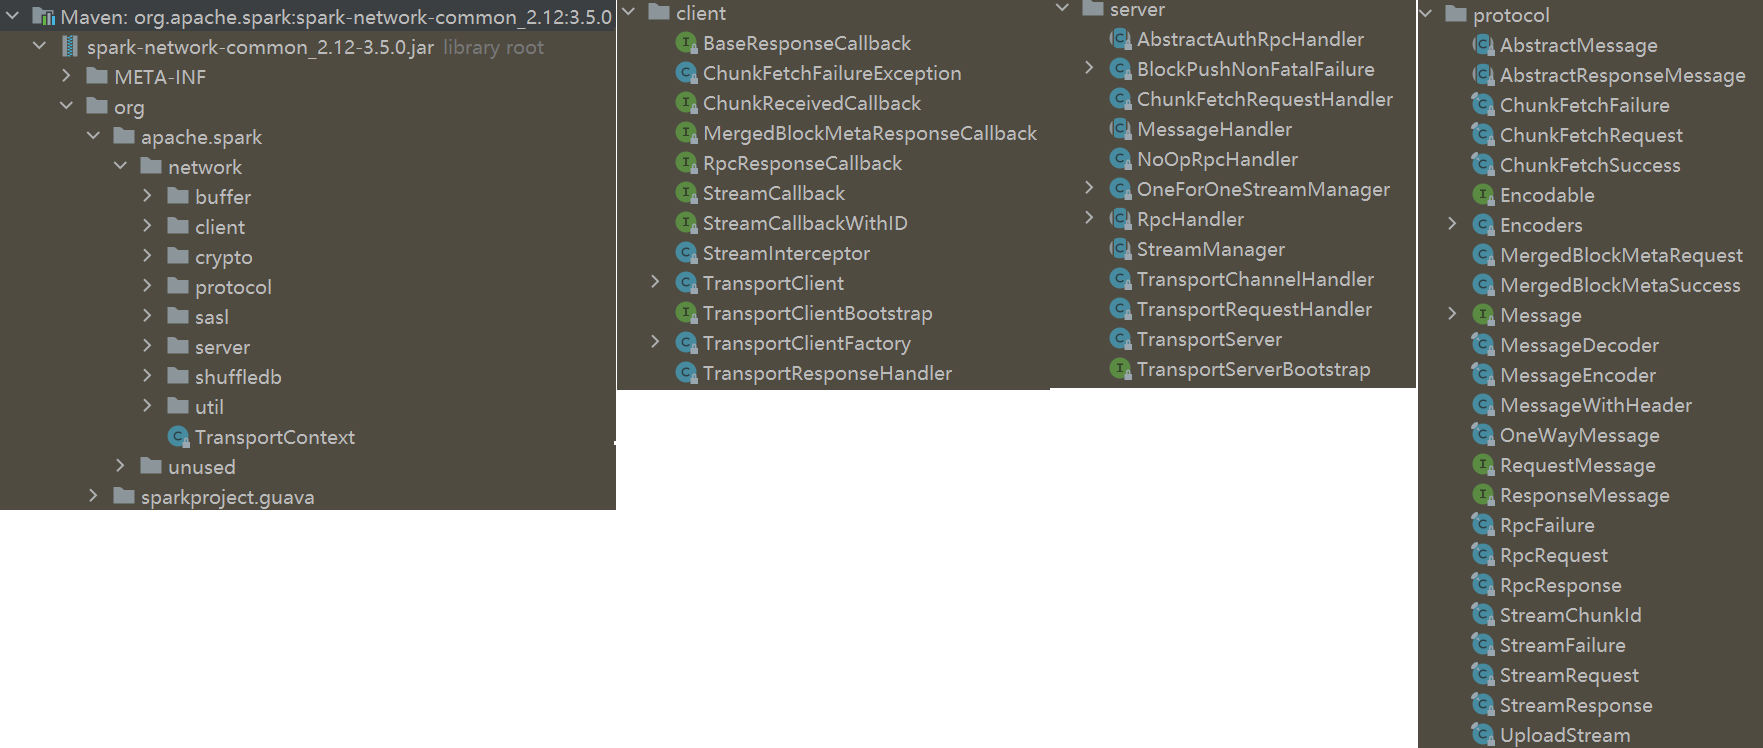
解释
- 这个包里面的主要是对 netty 的封装,还有一些 server 和 client 类
- 以及 安全传输方面的,sasl 的
- shuffle db,包括了 LevelDB、RocksDB
- protocl 是 spark继承了 netty 体系,发送时封装的包协议
- buffer 是 发送的 protocol 中用到的 一些buffer
初始化过程

发送过程
RpcEndpoint 和 RpcEndpointRef 之间的关系
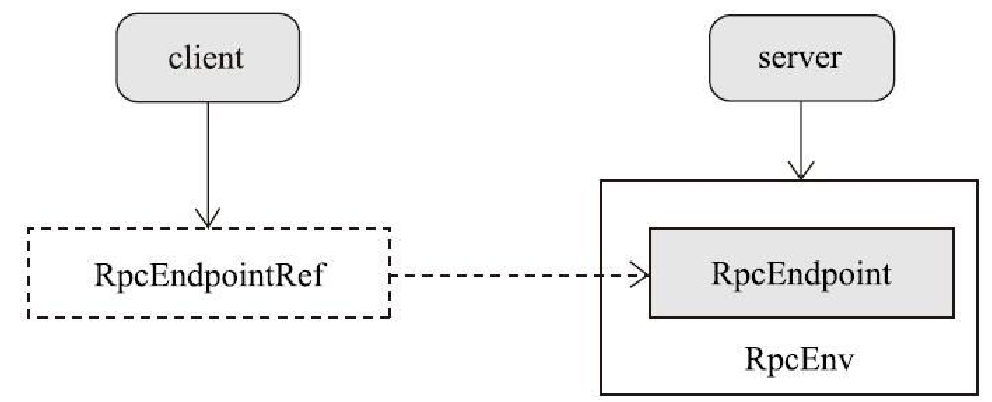
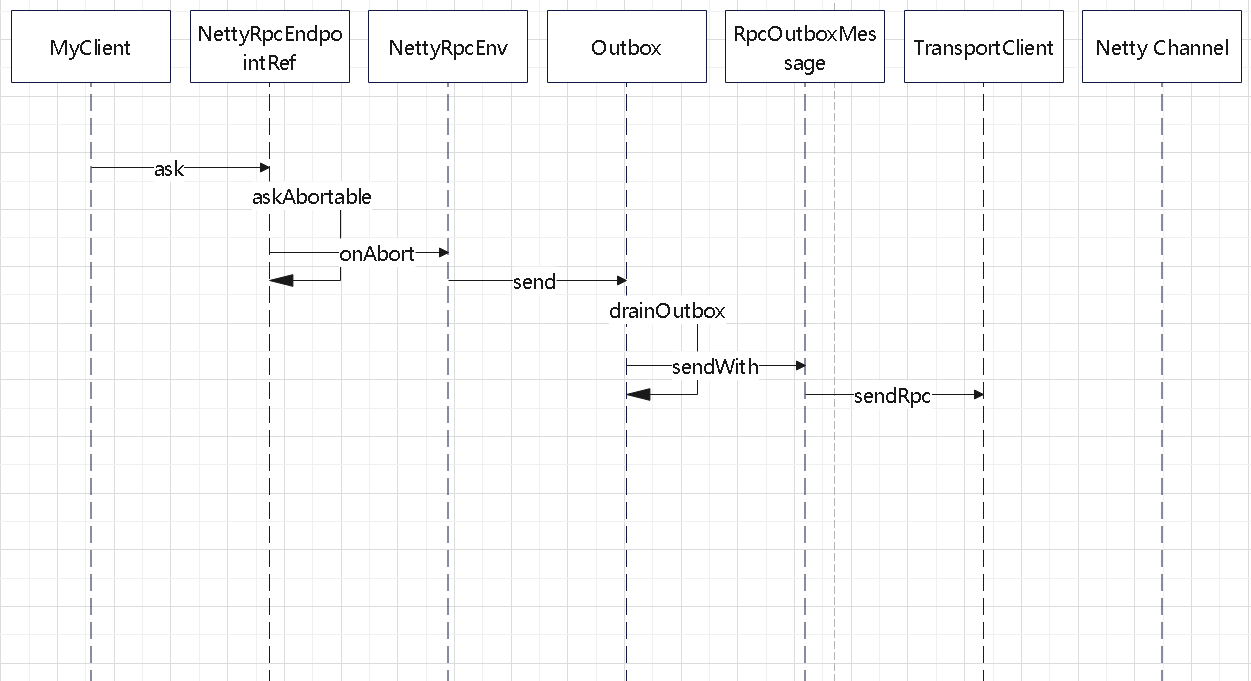
发送过程
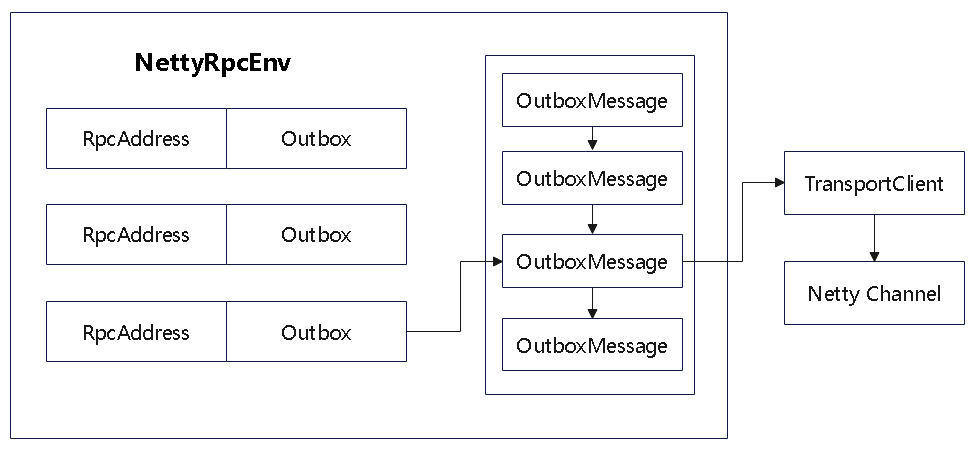
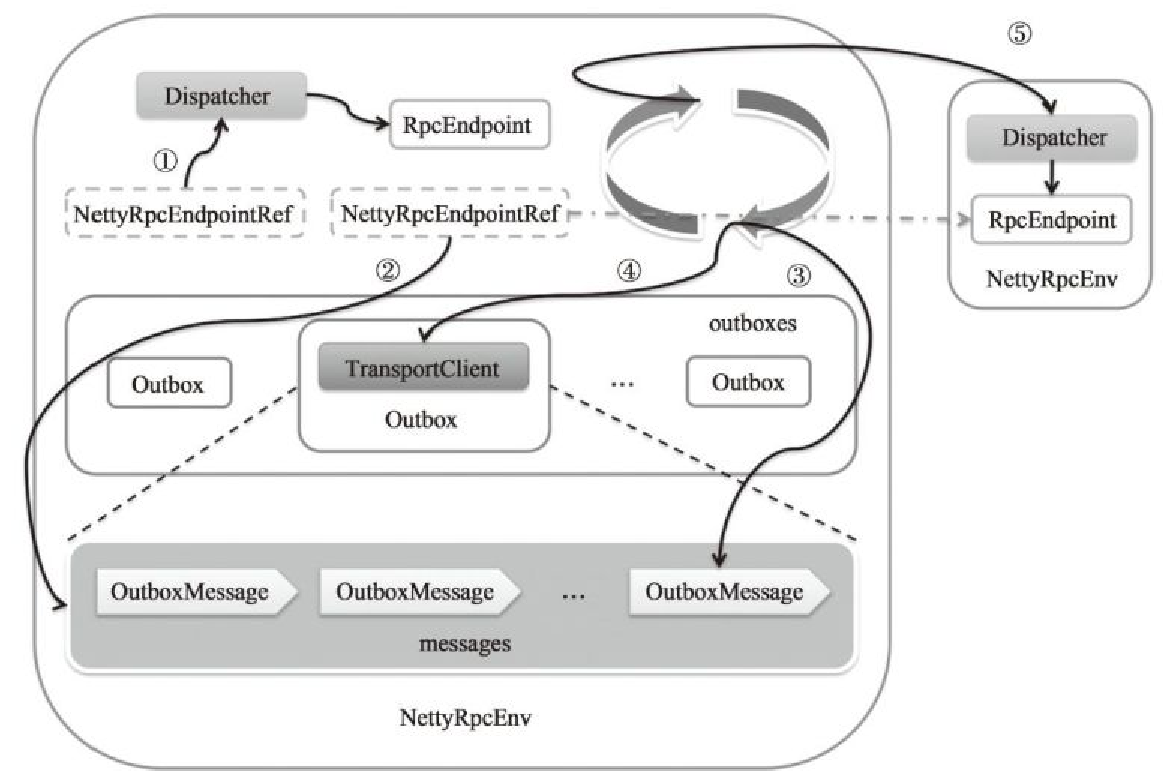
NettyRpcEnv 中维护了 Outbox 的 map
1
|
val outboxes = new ConcurrentHashMap[RpcAddress, Outbox]()
|
而 Outbox 内部为了 OutboxMessage 的 list
1
|
val messages = new java.util.LinkedList[OutboxMessage]
|
发送体系的结构如下图,所以一个节点是可以发送给多个接收方的
接收过程
接收的体系
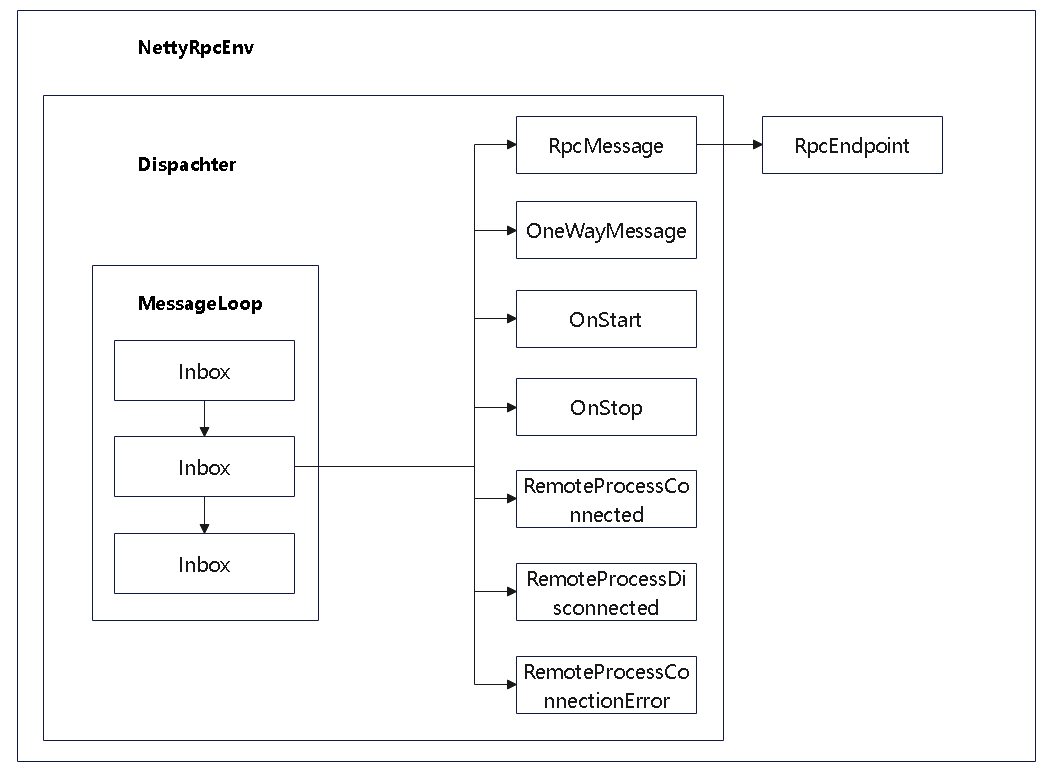
解释
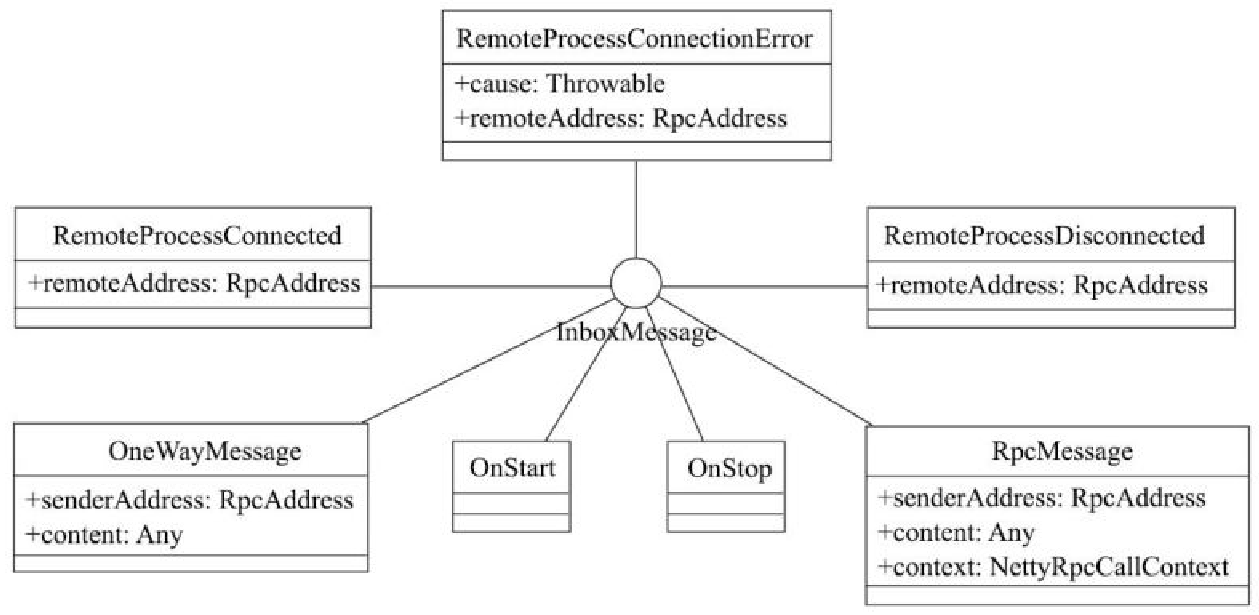
- MessageLoop 中维护了 Inbox 的链表
- 每个Inbox 中为了 InboxMessage 的链表
- InboxMessage 是抽象类,实现类如上图
- 如果是 RpcMessage 还需要回复响应,调用 endpoint.receiveAndReply 回复
- 这里的 endpoint 类型非常多,比如有 HeartbeatReceiver 这种的,他的 函数大致如下:
 1
 2
 3
 4
 5
 6
 7
 8
 9
10
11
12
13
14
15
16
17
|
override def receiveAndReply(context: RpcCallContext): PartialFunction[Any, Unit] = {
    // Messages sent and received locally
    case ExecutorRegistered(executorId) =>
      executorLastSeen(executorId) = clock.getTimeMillis()
      context.reply(true)
    case ExecutorRemoved(executorId) =>
      executorLastSeen.remove(executorId)
      context.reply(true)
    case TaskSchedulerIsSet =>
      scheduler = sc.taskScheduler
      context.reply(true)
    case ExpireDeadHosts =>
      expireDeadHosts()
      context.reply(true)
...
...
}
|
读取的时序图
- netty 的线程接收到请求,交给 Dispatcher
- Dispatcher 中定义了 endpoint 名字 和 MessageLoop 的关系
- 获取到 MessageLoop 后,交给 MessageLoop 去处理
- 在 MessageLoop#post 中,将消息放到 Inbox 中,然后往阻塞队列中方一个消息
- 后面阻塞队列会被唤醒,然后由 MessageLoop 线程再去处理这些具体的消息
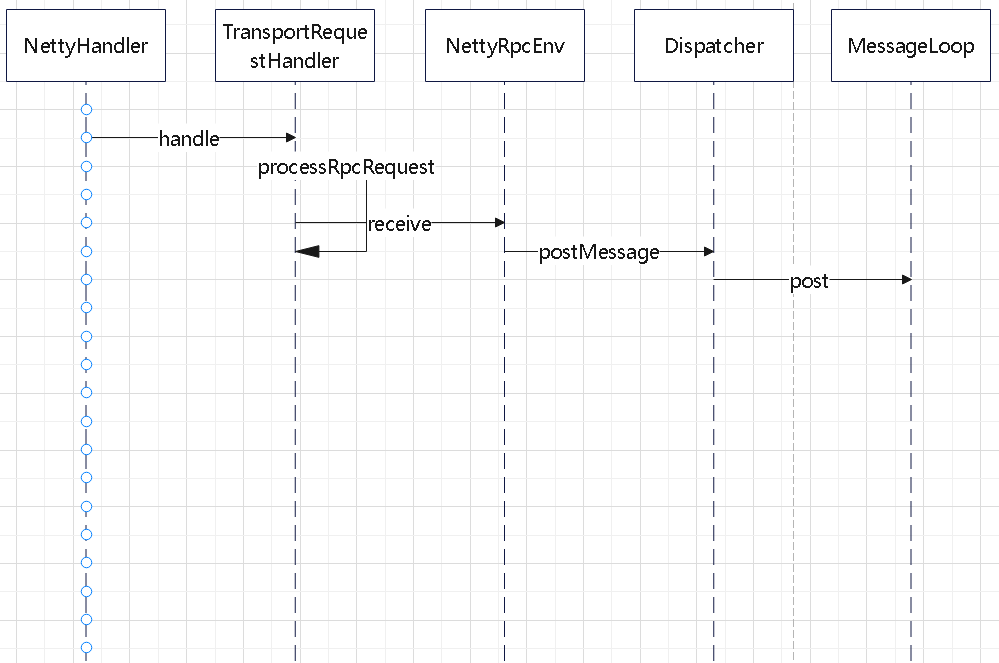
下面是 Dispatcher 中定义的映射关系
1
2
|
val endpoints: ConcurrentMap[String, MessageLoop] =
    new ConcurrentHashMap[String, MessageLoop]
|
MessageLoop 线程处理的时序图
- MessageLoop 中接收到消息,转给 Inbox 处理
- Inbox 则交给 具体的 Endpoint#receiveAndReply响应
- 具体的类型有很多,比如 HeartbeatReceiver 会接受到请求,再回复响应
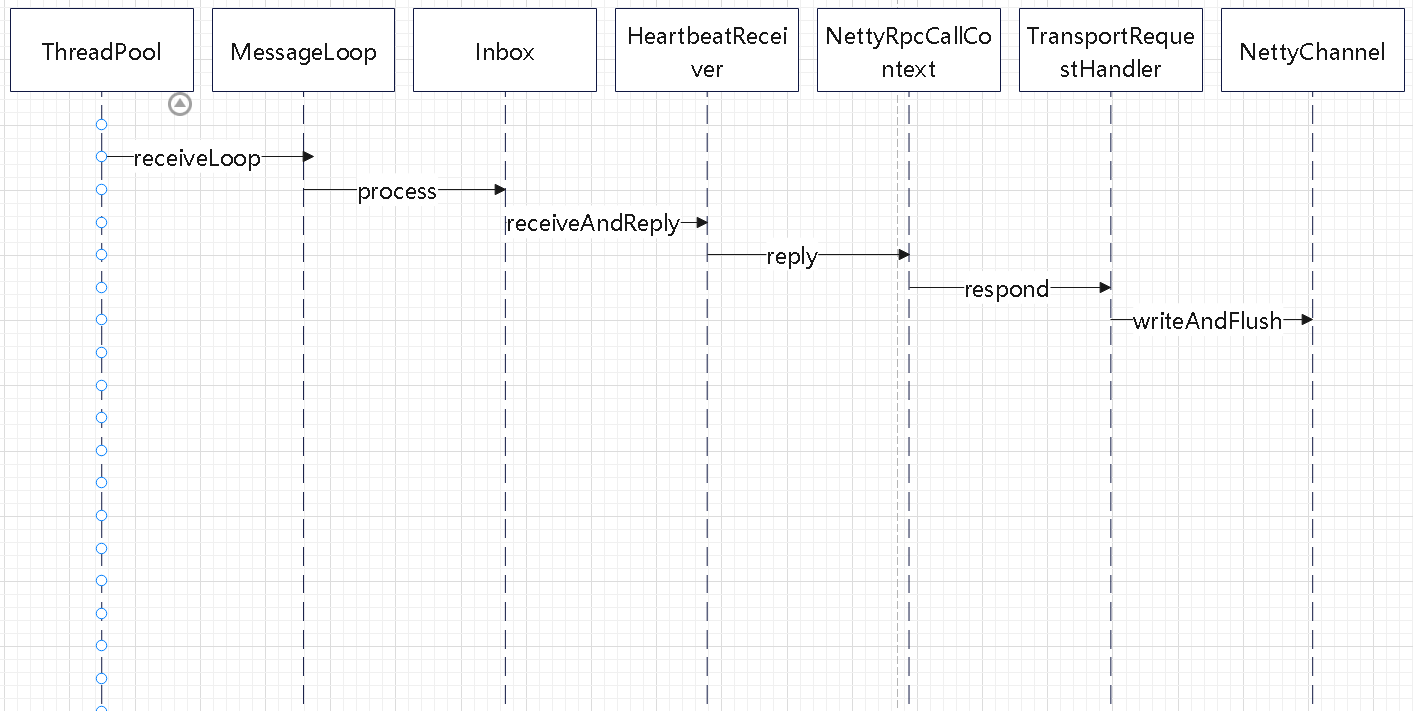
RpcEndpoint 相关类图
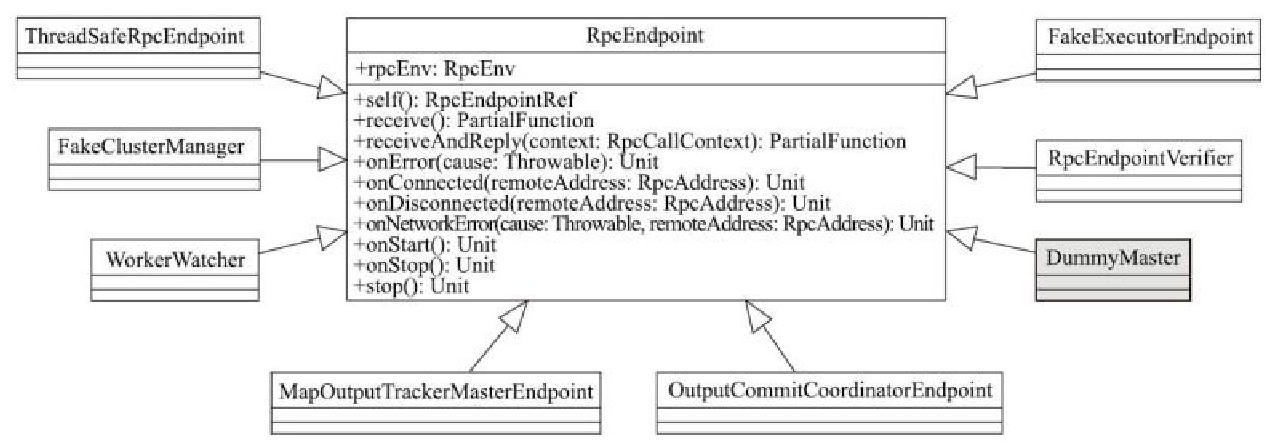
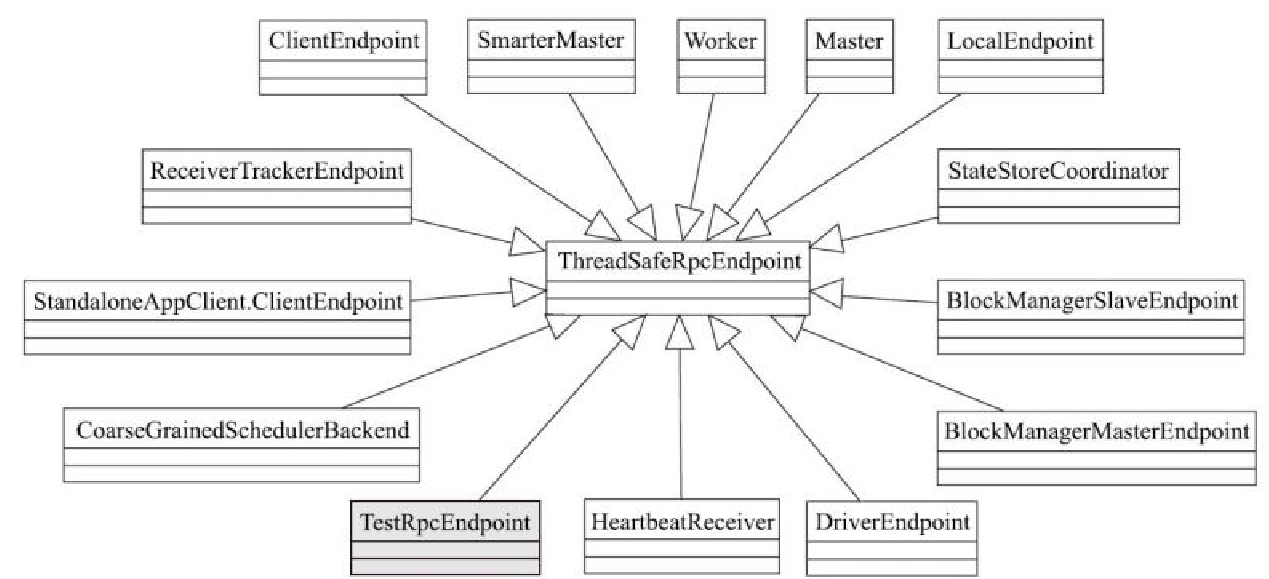
ThreadSafeRpcEndpoint 相关类图
InboxMessage 继承关系
下图简述了一个发送关系
- (1)表示本地发送
- (2)源端发送
- (3)每个Outbox的drainOutbox 通过循环,不断从messages列表中取得OutboxMessage
- (4)和(5)表示真实发送
参考


